How to Make a Laptop Sleeve: Dress Your Laptop in Style

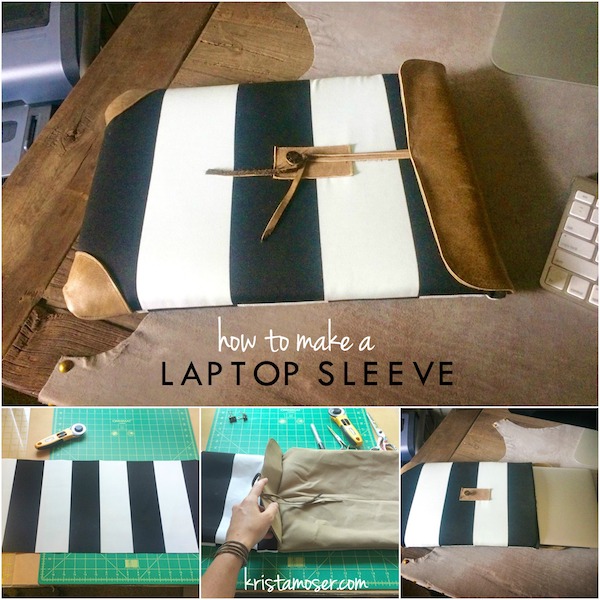
After precariously schlepping my unprotected laptop around for work, I figured I’d better not tempt fate any longer and this is what I came up with! I used a piece of lawn furniture fabric (think water resistant) and some cowhide leather, I keep around for just such projects. I lined it with canvas and used ½” foam for the protective cushion between the layers.

I was making this for a 13” laptop (that actually measured closer to 12.5”x 9.5”). I cut my outer fabric about 2.5” wider and longer than the laptop. Because I wanted the bottom to be seamless, I cut my piece 12” wide x 30” long with the intention of folding it in half.
I cut two pieces of lining canvas at 12” x 15.5”. I then used a small glass dish to round the two bottom corners of the lining, giving myself a ⅜” seam allowance.

Pin the two lining layers together and stitch, leaving a large opening on the bottom edge (between markings). Make sure to backstitch at the top edges and again on either side of the opening on the bottom edge. You will only be sewing three sides together, the sides and the part of the bottom (leave the top edge open).

Clip the excess fabric from the corners. Set the lining aside.
For the leather corners on the outer piece, I used a soup bowl (I know, super scientific.) This bowl is about 6” across and can be used as a circle template that can then be cut into two halves, or in my case, I used it to draw two halves on smaller scraps of leather I had on hand.

Fold your outer fabric in half and mark the center on both sides (in my case it was at the 15” line). Place your two half circles centered over those markings.

You won’t easily get straight pins through the leather so I opted for some tacky glue spray to hold my pieces in place while I sewed them down. This is Aleene’s Tacky Spray and it works pretty well.! (I’m sure there are other brands that would do work just as well.) Spray a small amount on the backside of the leather, just enough to make it tacky and press them back in their places. Stitch them down along the curved edge (no need to stitch the straight edge, we will do that with the side seams).

Cut a small rectangle of leather for the button tab: I cut mine 1.5” x 3”. Use the tacky glue again to secure it to the front middle of the outer cover. I placed mine about 4.5” from the top edge and halfway between the two sides. Stitch this down close to the edge.

I used a denim button pounded through the leather and the cover fabric. These are easy to install, all you need is the front and back of the button and a hammer to pound the two together!

Fold the outer fabric in half and pin along the two sides. Use the glass dish as before to curve the bottom two corners leaving a ⅜” seam allowance on the two sides only, letting the curved line drift off the bottom edge. Sew the two side seams curving at the bottom and backstitching at the top on both sides. Cut away the excess fabric from around the curve. Turn the cover right side out at this point.

Now for the flap. I cut the canvas piece the same width as the body of the sleeve (in my case that was 12” x 3 ¾”.) Use the same glass dish to curve the two bottom edges of the flap. Now, press under the the two sides and the bottom edge around the curve about ⅜”. Use this as your template to cut out a matching flap in leather.

Cut a thin strip of leather to be used as the tie (about ¼” x 20”). Mark the center on the canvas side of the flap for the tie placement. Use the tacky spray, again, to secure the two sides of the flap together tucking the tie in between the layers where the marking is. Stitch these together along the two sides and across the bottom. I did a little backstitch over the tie to be sure it was secure.

Place the flap along the top edge of the back of the outer cover centered between the side seams (leather side towards the cover fabric). You may need binder clamps to hold this in place while you stitch. Stitch it in place with a ¼” seam allowance.

Stuff the outer cover into the lining matching the side seams and pinning it all along the top edge (use the binder clips again where the leather flap is). The fabrics should be right sides together at this point. Stitch the top edge all the way around with a ½” seam allowance.

Pull the outer cover and flap through the hole in the bottom of the lining fabric, turning the lining fabric right side out as you do.

Cut two pieces of ½” foam just bigger than your laptop (mine were 11”x14”) Curve the bottom and shape the edges on both pieces to soften the harsh corners. Stuff both pieces of foam though the hole in the lining and arrange them in the outer cover side (they should be a snug fit).

Pin and topstitch the hole closed, close to the edge.

Now stuff the lining down into the sleeve in between the two layers of foam. Be sure to get the corners nice and pushed in so there’s no extra fabric in the way.

Voila! You’re done!
POST BY:


The Day I Decided to Make Sandals
Also find Krista on Etsy, Instagram, Facebook, Pinterest!


Leave a Comment